


How To Search For An Email In Outlook For Mac

How May I Fix Email Search Not Working In Outlook For Mac. Convert wmv files to mp4 mac free. Outlook is found as an email account by which you can send and receive millions and millions of emails within an organization and at the personal level.An email app can be maintained and upgraded timely but sometimes you may be got a freeze.It always gets difficult for the users to execute and understand the updated edition of Outlook.
Sorting Data in Pivot Tables for Excel for Mac 2011 I'm looking to sort the row labels in a pivot table in to a custom sort format. I've selected the rows and clicked Sort > Custom Sort > Then selected labels > Then clicked Options. MS Excel 2011: Pivot Tables (Tutorial Complete) Congratulations, you have completed the Excel 2011 tutorial that explains Pivot Tables in Excel 2011 for Mac. Tutorial Summary. Excel 2011 is a version of Excel developed by Microsoft that runs on the Mac platform. Each version of Excel can 'look and feel' completely different from another. 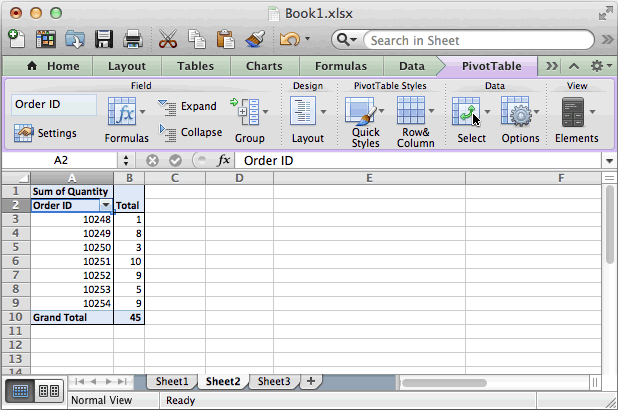 (Optional) Select a cell in your data range or table. Choose Data→PivotTable. Alternatively, on the Ribbon’s Tables tab, go to the Tools group and click Summarize with PivotTable. Choose the data to analyze: Make choices from the following options: Location: If you performed Step 1, your table or range is already filled in for you. If you didn’t start with a table or range, you can select a data range or table using the mouse. Highlight the cell where you'd like to see the pivot table. In this example, we've selected cell A1 on Sheet2. Next, select the Data tab from the toolbar at the top of the screen.
Ok for those of you looking to find a way to move or migrate your email over to Mac Outlook 2016 from Mac Mail. Here's a real simple method. Let's assume that you have been using Mac email and your email was setup as a pop or IMAP account. Now you want to switch your email account over to office 365 or Exchange environment and start using Outlook for Mac 2016. So you'll have to migrate your mail over to Outlook for Mac. 1) In your Mac email app, setup another email account but select 'Exchange' as the email configuration. Then enter your email address.
You should move it to the Trash', then follow these steps. • Open Apple menu - System Preferences - Security and Privacy - General tab. Gatekeeper options are found under the header 'Allow applications downloaded from:'. • Set the 'Gatekeeper' option to 'Anywhere'. • Once the import is done, be sure to restore the Gatekeeper option to the original value. • Point it to the folder where your MBOX files are located.
If you've never used Mail and you're opening it for the first time, the add account wizard will appear automatically. Step 3: In the address field, enter a bogus e-mail address and leave the password field blank, then click Continue. Screenshot by Ed Rhee/CNET Step 4: For incoming mail server settings, make sure that the account type is set to IMAP, then enter 'imap-mail.outlook.com' as your incoming mail server. Enter your real Outlook.com e-mail address and password in the username and password fields. Remember to use your app password here if you're using two-step verification. Click Continue to move on to the outgoing mail server settings.
Simply click 'Choose' and Apple Mail will import the files. • In some cases, when you import a large MBOX file into Apple Mail, then look in the Imported folder, you would see only headers and no message bodies.
• Open Entourage. • Simply drag and drop the mbox file(s) onto the Entourage Inbox (in the Entourage folder list). • After that, you should see a small triangle to the left of the Inbox. Click on it to display the newly imported folder(s). Note: If you have a large number of messages, Entourage might take a bit of time processing your MBOX file. You are done. • if you would like to see the entire process in action.
Please Choose Setup a New Backup Profile Step 5: You Will be presented options of Mail Clients > Choose Outlook Mac 2011 or Outlook Mac 2015 depending on which version you are using and proceed to next step Step 6: You will be presented with folder structure from Outlook Mac 2011 / 2015 Mail Accounts. Free skype update for mac. Please select/ deselect the folders you would like to backup from Outlook Mac 2011 / 2015. Step 7: Now you are presented with Advanced options like Frequency of Mail backup ( select Automatic as its recommended or you may choose the days and time frame for backup), You may also choose to add and setup Mirror locations for multiple copies of backups for extra security. You May also activate the Auto USB Sync. So, whenever you connect the USB drive, It automatically copies and syncs a copy of local backup to the USB Disc in the background automatically. Step 8: Backup Profile is set up and now your emails are set to be backed up as per the options and settings you selected during the previous steps. Mail Backup X - officially Ready for OS X Mojave A must have Email Backup App for Millions of Mac user's and companies worldwide!